
Key Takeaways:
- Homeowners and business owners should invest in tuckpointing to protect their property from the elements.
- Tuckpointing is extracting deteriorated mortar between bricks, replacing it with matching or contrasting colored material, and adding putty down the center for an eye-catching effect.
- To understand more about this procedure, one must learn masonry terms such as pointing (filling mortar joints during new construction), repointing (refreshing existing joints), and tuckpointing (a complete repoint job that includes placing contrasting lines in each joint).
- DIYers can attempt this project; however, professionals are recommended for the best results due to precision requirements.
Do you gaze at the exterior of your home or business with pride and admiration? Or, do you cast an eye over it and wonder what hidden damage time, weathering, and wear have done to your hard work?
Invest in tuckpointing as a preventative maintenance solution to protect masonry exteriors from wind, rain, ice, and snow!
Let’s take a deeper look into this age-old practice that has helped preserve thousands of buildings for hundreds of years. With wisdom from master craftsmen, poetic descriptions of nature’s relentless toll on our structures, and a healthy dose of info, get ready for an exciting journey with Purcell’s Paving and Masonry, exploring how tuckpointing protects masonry exteriors from the elements!
What’s Tuckpointing?
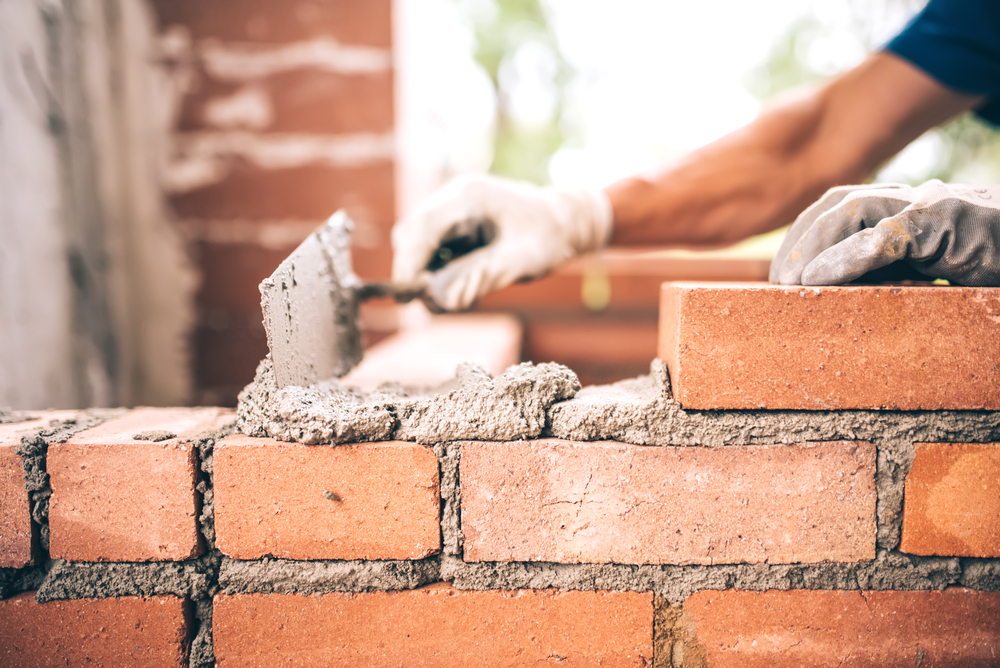
Bricks provide long-lasting cladding when constructing interior and exterior walls, chimneys, and fireplaces. However, the mortar between them can erode even when the bricks remain in great condition. That’s where tuckpointing steps in to save the day!
Tuckpointing is the perfect way to breathe new life into masonry. The process involves extracting part of the worn-out mortar from between bricks, replacing it with a matching colored one, and then slathering on contrasting putty down the joint’s middle for an eye-catching effect.
Though tuckpointing goes well with all brickwork structures, it has become widely popular among proprietors wanting to restore their historical dwellings’ original slim joints look.
Does your brickwork need a facelift and protection from crumbling mortar? Read on to find out more about tuckpointing, as well as helpful guidelines for proper application.
Understanding Mortar Lingo
To become more acquainted with the tuckpointing process, it would be beneficial for you to learn these particular masonry terms:
1. Pointing
During new construction, the filling of mortar joints is called “pointing.” The term also describes the actual spaces between bricks in a finished wall.
2. Repointing
Revamping and refreshing mortar joints by extracting the existing mortar and injecting new material.
3. Tuckpointing
A complete repointing job involves chiseling out the worn mortar between the bricks and replacing it with a fresh new mortar that matches or contrasts in color with your bricks. To achieve an aesthetically pleasing result, narrow lines of putty—called ‘fillets’—are placed down the center of each newly laid joint.
Know The Difference!
While “tuckpointing” and “repointing” are often used interchangeably, they produce two different finished looks. Both procedures include replacing deteriorating mortar with fresh material; however, tuckpointing has an additional step of placing contrasting lines in the center of each joint to create a more decorative outcome.
Homeowners may elect tuckpointing for its visually appealing outcome. It is due to the mortar blending with the brick, which creates an indistinguishable look from a distance. The fillets give off the illusion of straight lines that appear as if constructed by new masonry — making your wall seem pristine and freshly built! Your guests will be left admiring this precise yet stunning craftsmanship.
Also, Read – Belgian Blocks – A Speedy History For The Eager Driveway Paver
The Process Of Tuckpointing
Whether you opt for a DIY approach or hire an expert, the following are the necessary steps to ensure successful tuckpointing.
Step 1
Dig out the existing mortar joints to a depth of roughly one inch. The most common approach is using an angle grinder. However, this task can create quite a mess and requires you to wear protective gear such as a respirator mask. On the other hand, if time isn’t an issue, then relying on more traditional methods like hammer and chisel could be beneficial too!
Step 2
Carefully sweep dust and particulate away from the mortar joints with a bristle brush or high-power air nozzle for optimal results.
Step 3
Mix the new mortar with a mortar pigment to get the same hue as your existing bricks. You may experiment for a bit before finding the perfect match. Once you do, record how much of each ingredient is needed so that future batches come out just like it!
Step 4
Before beginning the job, it’s important to observe a mason and learn their trade tricks so you don’t end up with mortar all over your bricks. When ready, start by filling joints horizontally before moving in other directions. Ensure you use new mortar for the best results!
Step 5
Once the wet mortar is applied to the joints, it should be flattened or shaped into a slight concave curve (depending on your aesthetic preference) for an even, polished finish.
Step 6
Now that the mortar has begun to harden, but is still workable, use a tuckpointing tool and straightedge for creating neat lines down the middle of each joint. Aim for precision in this step!
Step 7
To create distinctive fillets, accurately spread lime putty along the grooves and trim away any excess. A mason often uses a straightedge and sharp knife to achieve uniform lines in wider mortar joints easily. By following this process, you can ensure that your lines are even and aesthetically pleasing.
DIY?
Homeowners may think they can tackle tuckpointing on their own. Yet, it can be extremely difficult to get the precise accuracy required for beautiful and even-looking mortar lines. The slightest miscalculations in forming the fillets could result in an unappealing finished product — which is why we recommend entrusting this project to a professional who understands all that goes into perfecting the process.
The cost for professional tuckpointing ranges from around $9 to $15 per square foot, depending on your wall’s height and the prevailing mason rate in your vicinity. However, suppose you’re feeling adventurous enough to attempt DIY tuckpointing. In that case, the materials required (mortar and lime putty) will be a fraction of that price – less than one dollar per square foot – plus renting out the necessary tools can amount to about forty-five dollars a day!
When attempting to repoint or tuckpoint bricks, the task must be assigned to experienced professionals when replacing entire blocks – particularly for external load-bearing walls. Placing and resetting fresh bricks is more intricate than restoring a stable wall or chimney with point work. Therefore, it’s essential that you hire experts who know how to do this function properly.
Here’s How We Can Help!
Has the masonry of your home or workplace begun to show signs of wear and tear? Was it damaged after a recent storm, or are you merely looking for an upgrade with some expertly crafted masonry work? If so, look no further than Purcell’s Paving and Masonry! We’re here to help give your property in New Providence, NJ, that fresh new touch.
At our masonry firm, we are qualified to handle all projects – big or small. We boast years of experience in the industry and an expert team passionate about delivering unparalleled craftsmanship with each job. Whether foundation repair, stone carving, bricklaying, or tuckpointing, you can count on us for exceptional results! Our commitment to excellence also translates into developing new ways to enhance our services further. Get a free estimate.
Connect with us


Categories
From Excavation to Construction & Paving, We’re Your Friendly One-Stop Shop!
Providing a Full Range of Masonry and Paving Services in Bridgewater, New Jersey. Satisfaction Guaranteed!
Purcell's Paving and Masonry
-
778 Harding Road
Bridgewater, NJ 08807 - Mike (Owner) 908-906-0564
- purcellpavingmasonrynj@gmail.com
Our Services
Hours of Operation
| Monday | 7:00AM - 7:00PM |
| Tuesday | 7:00AM - 7:00PM |
| Wednesday | 7:00AM - 7:00PM |
| Thursday | 7:00AM - 7:00PM |
| Friday | 7:00AM - 7:00PM |
| Saturday | Closed |
| Sunday | Closed |
License#
Home improvement contractor 13VH09365200